Rustware Part 2: Process Enumeration Development
In the previous blog post we have seen how to develop a Shellcode Process Injection in Rust; the described Process Injection flow relies on several WinAPIs: OpenProcess used to open a handle to the target process, then the VirtualAllocEx was used to allocate a new readable and writable region of memory into the target process, the WriteProcessMemory wrote the shellcode into the new allocated memory, then the VirtualProtectEx was used to change the new allocated memory protection to readable and executable in order to allow the CreateRemoteThread to execute the shellcode contained into the new allocated memory in the target process.
Generally, a malware targets one or more processes, it iterates over the existing system processes in order to find the target process, get its PID and inject the payload into it.
This blog post describes how to iterate over processes and find a specified process PID in Rust; to do that, we use the CreateToolhelp32Snapshot to create a snapshot of all the running processes in the system, then using Process32First and Process32Next we can iterate all the system processes to find the target process and get its PID, after that we use the inject function to perform the shellcode process injection.
The information contained in this blog post is for educational purposes only.
Process Enumeration
The process enumeration we are going to develop is very simple, it uses the following WinAPIs:
- CreateToolhelp32Snapshot: gets a handle to a snapshot, it includes all the running processes in the system
- Process32First: gets information about the first process in the snapshot
- Process32Next: gets information about the next process in the snapshot

The running process information from the snapshot is stored in the struct PROCESSENTRY32 struct.
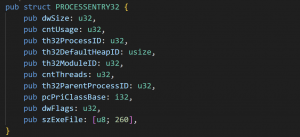
We are interested in the process name contained in the szExeFile field and in the process PID containted in the th32ProcessID field.
Rustware Setup
Everything we need to develop a Rust program that leverages on WinAPI, is well described in the Microsoft “Developing with Rust on Windows”.
In our case, we used the following software, plugins and crate:
- Visual Studio Code 1.83.0
- Rust-analyzer 0.3.1689
- CodeLLDB 1.10.0
- Crates 0.6.3
- Windows Crate 0.51.1
Rustware Development
First of all, it is necessary to add the Windows Crate and the features required by each WinAPI to the Cargo.toml file; we can see the features in the Windows Crate documentation.

Below, a list of the WinAPIs we are going to use and the features they require:
- CreateToolhelp32Snapshot:” Win32_System_Diagnostics_ToolHelp” and “Win32_Foundation”
- Process32First: :”Win32_System_Diagnostics_ToolHelp” and “Win32_Foundation”
- Process32Next: ”Win32_System_Diagnostics_ToolHelp” and “Win32_Foundation”
After adding the Windows Crate and all the WinAPIs features, the Cargo.toml file will look like this.
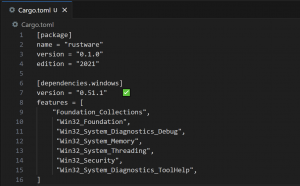
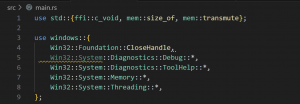
Each feature must also be imported in the code; we can achieve this with the use declaration as shown in the image below.
The find_pid function takes the target process name as parameter and returns its PID.

We have to declare a variable pe32 as a PROCESSENTRY32 struct, a string cur_process_name for the process name and a Result variable result_process32 for the Process32First and Process32Next return value, we must set the dwSize by getting the size of the PROCESSENTRY32 struct.

As seen in the previous blog post, the WinAPIs we are going to use are defined as unsafe function, so we need to add an unsafe block to use them.

The CreateToolhelp32Snapshot in the code below return an error, or a handle to a snapshot, in this case TH32CS_SNAPPROCESS means that all the running system processes must be included in the snapshot.

After that we can iterate all the processes in the snapshot by using Process32First and Process32Next; these two WinAPIs save the process details in the PROCESSENTRY32 struct contained in the variable pe32. In each iteration we get the process name from the szExeFile field, convert it to utf8 string, and remove all the 0x00 bytes; then we compare the target process name with the current process name, if they match, we return it’s PID from the th32ProcessID field, otherwise we clear the szExeFile field and repeat the loop again.
The function returns 0 if the target process is not found or if an error is generated.
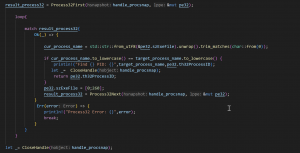
In order to use the find_pid function, we can change the main function from the previous blog post as shown below.
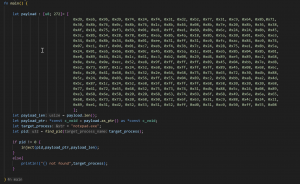
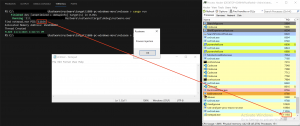
Using the target flag, we can specifying the i686 architecture and compile the program into a 32bit binary.

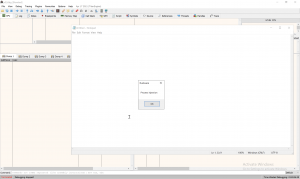
Running it, we successfully find the notepad.exe PID and inject our MessageBox into it.
Debugging
Using Process Hacker and x32dbg we can debug our binary to understand how it works under the hood. We set the breakpoints on the WinAPIs that our binary is going to use.

CreateToolhelp32Snapshot
![]()
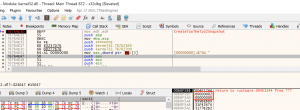
Running the debugger, we can see that the CreateToolhelp32Snapshot is correctly getting the two parameters:
- 0x2 is TH32CS_SNAPPROCESS
- The second parameter is 0x0
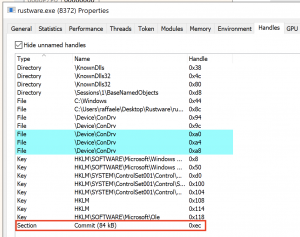
We can see the snapshot handle in our binary handles list.
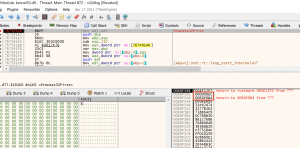
Process32First
![]()
We can see the two parameters:
- 0xEC is the snapshot handle
- 0x50F6B4 is the PROCESSENTRY32 struct address
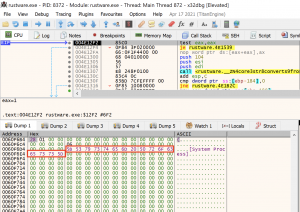
The szExeFile field is at offset 0x24, so at the address 0x50F6D8(0x50F6B4 + 0x24) we can see the process name.
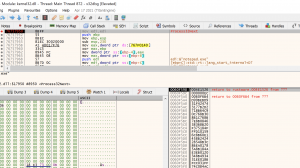
Process32Next
![]()
We can see the two parameters:
- 0xEC is the snapshot handle
- 0x50F6B4 is the PROCESSENTRY32 struct address
By continuing the execution, the WinAPIs seen in the previous blog post are executed and our MessageBox is injected into Notepad.exe
Conclusion
As already said, Rust is a very powerful language; in the last years it found its way into the malware development, especially for ransomware because of its speed. The interaction with WinAPI is not very easy because of the datatype mismatch.
At each iteration, we must manually clean the szExeFile field in the PROCESSENTRY32 struct to clear all the junk chars from the previous process name.
In the next blog post we would like to refactoring the code in order to be more “Rusty”.
Any feedback will be appreciated.
References
- https://learn.microsoft.com/en-us/windows/dev-environment/rust/
- https://microsoft.github.io/windows-docs-rs/doc/windows/
- https://socradar.io/why-ransomware-groups-switch-to-rust-programming-language/
- https://crates.io/crates/windows
- https://doc.rust-lang.org/book/
- https://www.ired.team/offensive-security/code-injection-process-injection/process-injection
- https://institute.sektor7.net
- https://maldevacademy.com
By Raffaele Sabato
Team Leader – Cyber Offensive Solutions and Services
Consulthink S.p.A.


